Downloading banking transactions into the QuickBooks desktop plays a crucial role in ensuring the safety and accuracy of financial transactions. Before we start discussing the ways to move the accounting details, let’s know a little more about the subject. There are generally two methods that can be used to download banking transactions to QuickBooks Desktop.
- Establishing a direct link between both platforms: A direct connection between QuickBooks desktop and bank feed will make things smooth.
- Through WebConnect (.qbo files): If you are using this method, you don’t need to give access to your QuickBooks to your bank account.
How Is Downloading Banking Transactions Into The Quickbooks Desktop Helpful?
It can’t be denied that doing things manually can get quite confusing, and time taking. So, if you can utilize the download feature for importing your bank feed to the QuickBooks desktop, you are surely going to notice how convenient and time-efficient it is. It is one of the most prominent features of QuickBooks. Many banks these days have online banking facilities, which makes it easier for QuickBooks to keep track of transactions. Check out a few reasons why it is a smart idea.
- Time efficiency
- Timely book updates
- Simple processing of reconciliation.
Before starting the actual process, set bank feed mode…
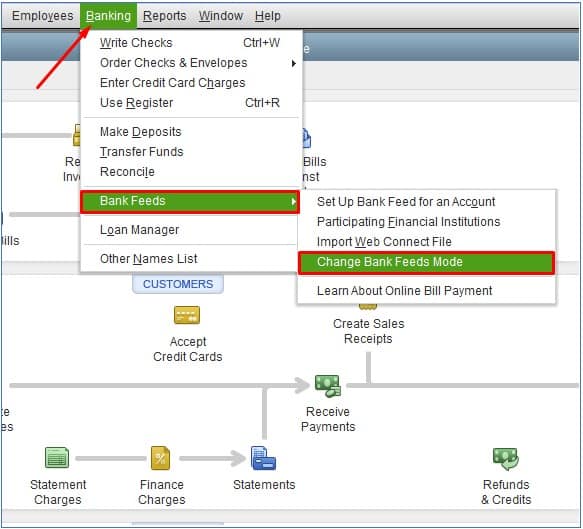
Change the mode of the bank feed to the latest, advanced modes. Make sure that you don’t tap on ‘classic mode’, as it may not allow the smooth import of bank feed to QB desktop. It is very important to understand that this step should be followed before proceeding with the downloading process. Here are quick steps on how to set Bank Feed Mode in QuickBooks.
- First, click on the Banking menu, and then select Bank Feeds
- Then, hit the ‘Change Bank Feeds’ mode drop-down

- A pop-up will appear, further, you need to set your bank feed preferences.
- Under the Checking menu, make sure that it is set, either to Advance, or Express mode. If it’s set on advanced by default then, click Ok to continue

How to Download Banking transactions to QuickBooks Desktop Through Direct Contact
Once you establish the mode of bank feed, you have successfully created a platform for direct connection between QuickBooks and your bank account. This direct connection further enhances the smooth processing of data. Downloading bank transactions to QuickBooks Desktop can be taken forward in 3 simple steps through direct connect.
Step 1. Use QuickBooks Desktop to log into your financial institution
- Go to your QuickBooks Desktop homepage
- Tap on the Banking menu stated in the top right corner of the screen.
- Now, select the Bank Feeds option, and then, click on ‘Set up Bank Feed‘. Immediately a pop-up screen will emerge with the instruction to temporarily shut all the QuickBooks windows.
- Further, Click Yes to continue.
Step 2. Link QuickBooks to your Bank
- Now that you have clicked on YES, you will see the bank feed setup screen on the display.
- Now, enter your Bank’s name. The process of connecting QB to a Bank may vary depending upon the variation in the financial institutions. So, you need to follow the prompts that appear from time to time. On your screen, until a login screen appears.
- Now, the log-in screen will pop up. Enter the bank account using the log-in credentials that you use to check the account information on the official website of your bank.
- If your bank doesn’t give you online banking facilities, you must request your bank to allow online access. Keep following the prompts while linking with the bank.
Step 3. Now finally download your bank transactions to the QB Desktop
- With the established bank feed established. Your bank will automatically import all your daily bank transactions into QuickBooks.
- Now you can use the bank feed centre to manage and review all the transactions in QuickBooks. Irrespective of your method of direct connect or web connect, the process of managing your transactions remains the same.
Download Banking Transactions to QuickBooks Desktop Through WebConnect
Users can use the WebConnect method if they are not sure about giving their QuickBooks access to their Online bank account. A WebConnect file (.qbo file format) is a file that can be obtained from the bank’s website and this type of file is supported by most banks. To download transactions through Webconnect, you must follow these steps.
Step 1. Download the WebConnect file
- Open your bank’s website
- Download the QB online file for the time being you are downloading the transactions.
- Ensure the file is in the .qbo extension.
Step 2. Import the WebConnect file into QuickBooks.
- To download your WebConnect file into QB.
- Click on the Banking menu and select Bank Feeds from the drop-down.
- Now tap on Import Web Connect File.
- Your WebConnect file is now Downloaded to QuickBooks Desktop.
- Further, you can review and manage your transactions in the banking centre.
Review and Manage Transactions in the Banking Center
As soon as the WebConnect files are imported to QuickBooks, the user will immediately be taken to the Bank feeds centre. Under the ‘banking’ menu. You will find four categories of transactions that need to be reviewed, that are Recognized transactions, Partially-recognized transactions, Unrecognized transactions, and Added to register.
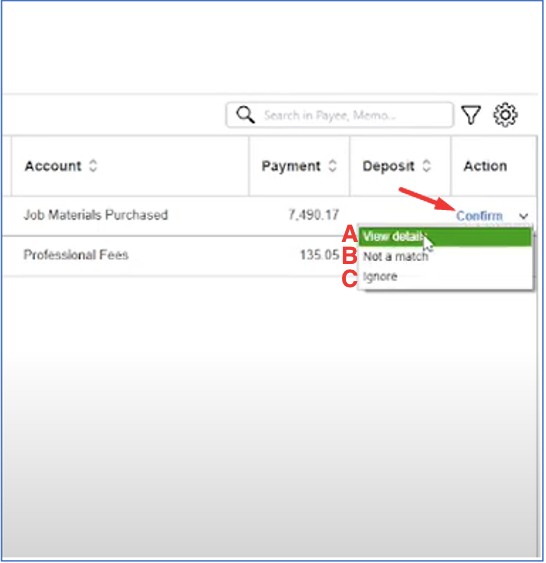
Manage recognised transactions: Confirm by clicking on ‘view details’ if it tallies your bank transactions. And if it doesn’t tally then click on ‘not a match’. The transaction will be shifted to an unrecognized section. Click Ignore if you don’t want to pay much attention to a particular transaction.

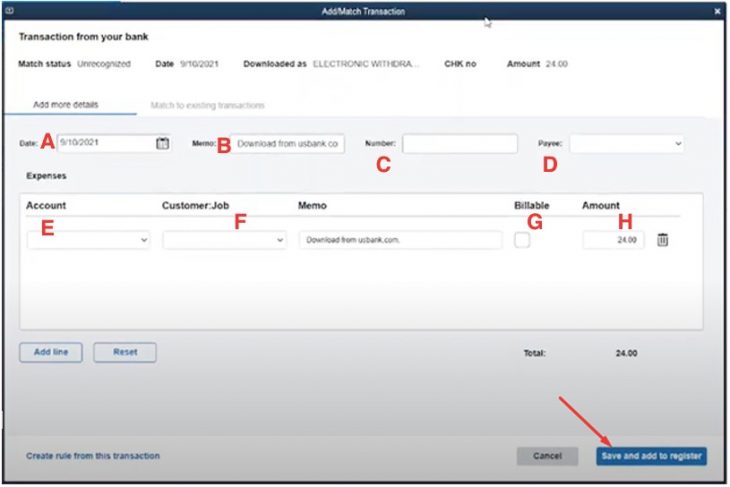
Manage Unrecognized transactions: If QuickBooks doesn’t match any transactions with your books, then you can review, and manually add them to the account register. The steps for manually adding them are:
- For this click on the Add More Details on the left side of the screen.
- Now a pop-up screen will open, requesting to add more details such as date, memo, number, payee, account, job, billable and amount.
- Finally, just click on save and add to register.

Now that you have come across the entire process to download banking transactions on the QuickBooks desktop, hopefully, it will be easier to execute the entire process without any hindrances. All you need to do is follow these steps very carefully along with the pop-ups and screen prompts. In case you face any issue or witness any abrupt change, you can take professional help at any moment.
- How to Manually Re-install QuickBooks on a New Computer
- Easy Methods to Set Up Class Tracking in QuickBooks
- How to Reactivate QuickBooks Desktop Payroll Subscription
- Custom Email Template Issue in QuickBooks, How to Fix?
- 5 Easy Solutions to Fix Desktop Display Errors in QuickBooks
- Fix QuickBooks Error 40001 Manually Using Quick and Easy Solutions
- Process to Eliminate QuickBooks Error 213
- How to Install QuickBooks in Two Computers Easily
- How to Fix QuickBooks Won’t Open Error like a Pro!
- What is QuickBooks Payroll Update Error And how to get rid of it
- Efficient Process to install and set up QuickBooks Database Server Manager
- Troubleshooting Methods for common QuickBooks Enterprise Errors
- QuickBooks Desktop Runtime Redistributable and its rectification
- What is the W2 form in QuickBooks Online Payroll
- Validation, License, and Registration errors in QuickBooks Desktop
- Features and Limitations of QuickBooks Mac Plus 2022
- What is QuickBooks Sales Tax Error And How to Resolve it?
- Incredible ways to get rid of QuickBooks Error Code 2501
- Quick Hacks to Eliminate QuickBooks Error Code 50004
- Resolving QuickBooks Error 6209 Efficiently like a pro!
- Ways to Troubleshoot QuickBooks Error 7300
- How to resolve QuickBooks Error Code 15222
- Troubleshooting Steps to Fix QuickBooks Error 6000 77
- How to Resolve Error OLSU 1024 in QuickBooks Manually at Home
- Perfect Way to Resolve QuickBooks Error 1117 and It’s Causes

