Popularly referred to as the Wage and Tax Statement form W-2 Form is a document that is sent from the employer to all the employees along with the internal Revenue Service (IRS) at the end of the year during the closing time. It is a report that highlights the annual wages of the employees and the total amount of taxes that are reserved from their paychecks. In case some employees are undergoing a tax deduction from their paychecks, and if they submit the information to the government then these people are known as W-2 Employees. An employer requires to send a W2 form in QuickBooks Online Payroll to every employee who is getting a salary from the organization. It must also be ensured that The form must be filled out before January 31 ensuring a sufficient time to file taxes before April 15.
Requirements to Print W-2 Form in QuickBooks
If you are planning to print W2 Forms in QuickBooks, then you must understand the system requirements before starting the process. Here are all the basic requirements to print W2 Forms in QuickBooks. Go through the below-mentioned instructions to avoid any glitch further.
- Ensure that you are using an updated version of QuickBooks while you are printing the W-2 form. You have to make sure that the QuickBooks version is compatible with the Windows OS that is installed on the desktop.
- Make sure that QuickBooks Payroll Service is active.
- W-2 paper must be agreeable in terms of the printer and the payroll service.
- Blank or perforated paper or the pre-printed form of a laser printer can be used. Apart from that pre-printed inkjet printer paper can also be used.
- You must have the latest release of the payroll tax table.
Verify the Payroll Service Before Printing W-2 form in QuickBooks Online Payroll
Before you start printing the W-2 form in QuickBooks, it is important to get the details about the version that you are using. The process may vary depending upon the version of QuickBooks payroll. Thus, you must follow the given steps to verify the payroll services you are using.
- Begin with signing in to QuickBooks Online.
- Further, you need to click on settings and then, select the Accounts & Settings option.
- Now go to the Billing Subscription and Payroll.
- Further, click on Plan details and you will get to know the current payroll plan you are using.
- If it shows Enhanced or Basic, it implies that it is QuickBooks self-service payroll.
- Well, if it represents Full-service payroll, then it means you have the QuickBooks Full-service payroll version.
How To Print W2 form in QuickBooks Online Payroll For Employees In QuickBooks?
The process of printing the W2 form in QuickBooks Online Payroll is dependent on the decision whether you pay and file your federal and state payroll taxes on your own or if you want QuickBooks to execute it for you. If you feel apprehensive about the manual process then you must take a leap toward automatic tax payment.
As we all know, there are multiple versions of QuickBooks payroll available. And many versions pay that pay and file tax for the users while other versions allow users to do it manually. Irrespective of the version that you are using, there are 2 conditions for printing the W2 form in QuickBooks
Here are the two conditions:
- When QuickBooks Pays and File your taxes on your behalf.
- When You Pay and File your taxes manually
Condition 1: Print W2 On Intuit QuickBooks Pays and File Taxes for you
If you are using the Payroll services of this category, everything will be taken care of automatically. Here are the categories that you can pick from:
- QuickBooks Online Payroll Core
- QuickBooks Online Payroll Premium
- QuickBooks Online Payroll Elite
- QuickBooks Online Payroll Full Service
- Intuit Online Payroll Full Service
QuickBooks ensures that all employees receive email Inclusive of W-2s starting January 20 through January 31. However, if you require the form to be generated from January 13, you can simply re-print it on plain paper by following the steps mentioned below.
- The first step is, to go to QuickBooks Online and navigate to the Taxes menu.
- In the next step, you must select the Payroll Tax option and then move to Filings and Annual Forms.
- Now you will get the option for printing both employer and employee copies of W-2 and W-3.
Employer Copies: Form W-2 (W-2, Copies A & D), Transmittal of Wage and Tax Statements
Employee Copies: Form W-2 (W-2, Copies B, C & 2).
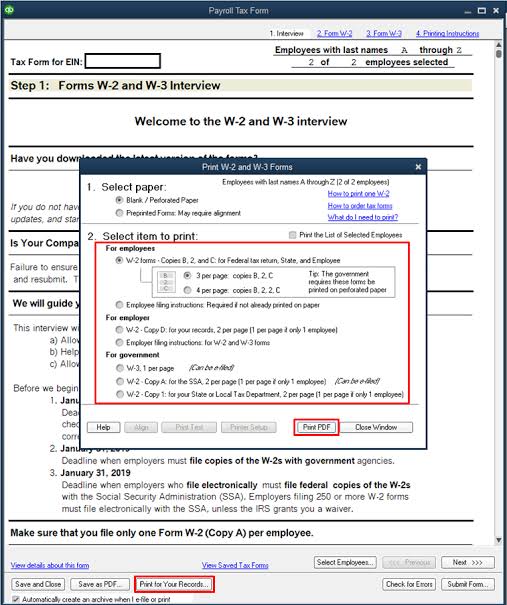
- If you still have not selected the W-2 printing preferences, a notification will pop up on your screen: “Before filing this form, you must set up W-2 printing”. You need to click on it and then select the paper.
- Moving to the next step, pick the required filing period under the dropdown menu.
- Now you must run the Adobe Reader in the new window and click on the print icon from the Reader toolbar.
Condition 2: When You Pay and File your Tax Manually
If you are an employer you need to print and mail the form to your Employees by 1st of February, if the payroll service that you are using falls under the category mentioned below.
- QuickBooks Online Payroll Premium
- QuickBooks Online Payroll Core
- QuickBooks Online Payroll Elite
- QuickBooks Online Payroll Enhanced
- QuickBooks Payroll Enhanced
- QuickBooks Payroll Standard.
- Intuit Online Payroll Enhanced
Here are the steps that you need to order to file and pay the tax on your own or by picking the above payroll services.
Step 1: Purchase W-2 paper
Are you thinking to order the W-2 kits, it is suggested that follow these steps:
- Begin with checking the supplies on QuickBooks and select Tax products.
- Now, to place your order, you need to follow the on-screen prompts
- After this step you can print the W2 form in QuickBooks Online Payroll without any hindrance. You can further print the employee copy either on Blank 3-part perforated paper or Blank 4-part perforated paper
Now that you have W-2 paper, you further need to set your printing preferences.
Step 2: Set Your Printing Preferences
To change or set your printing preferences follow the steps given below.
- Go to settings and click on the payroll settings option.
- From here go to the W2 print preference tab
- In the next step click on Edit.
- In the final step select your paper type and click on OK.
Step 3: Print Filed W-2 Forms in QuickBooks
Decided to file and pay the tax manually? So, now you must print your W-2s from the start of January 1.
- In the first step, select Taxes and then Payroll Tax. Further, you need to select the Filings option followed by selecting the Annual Forms.
- Now it’s your call if you want to print both employer and employee copies of your W-2s and W-3.
Employer Copies: Form W-2 (W-2, A & D), Transmittal of Wage and Tax Statements
Employee Copies: Form W-2 (W-2, B, C & 2).
- Now a prompt will pop up on the screen, to remind you to fill out the form. So, you have to set your W-2 printing preferences and click on them to select your printing paper.
- Further, you need to choose the required filing period from the dropdown.
- Now you must click on View to open the Adobe Reader in a new window. And then, click on the Print icon on the Reader toolbar.
- In the end, select the Print option once again.
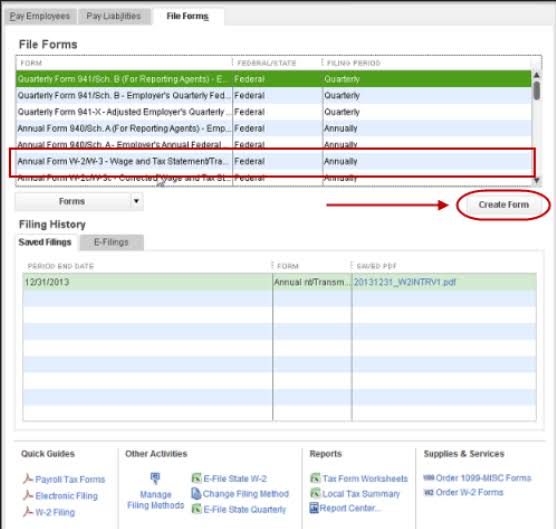
- Now choose the Payroll Tax forms & W-2s. After that click on Process Payroll Forms from the Employees dropdown menu.
- Further, you need to scroll down from the File forms tab and then you must select Annual Form W-2/W-3 – Wage and Tax Statement.
- In the next step, you should click on the Create form option
- Moving forward, you must either select all or individual employees to file.
- Now, you need to mention the year and, then click on OK.
- Make sure to review each W-2 form by tapping on the Review/ Edit option.
- Finally, select the submit form option and then print and fill out the form by following the on-screen notification.
How to Print W-2 Form In QuickBooks Desktop Payroll Assisted With Self Print Option?
Do you know if you can print the W2 form in QuickBooks when you are using the Payroll Assisted version in your Quickbooks? You can easily print the form using the self-print option if you follow the below-mentioned steps to run the Payroll Tax centre:
- In the first step, you need to open QuickBooks and then move to the Payroll Center included in the Employees menu.
- Now, you must click on the File Forms tab and then pick the View / Print Forms & W-2 option.
- Further, you need to enter the payroll PIN that you own and move forward to click on the W-2 tab.
- If you wish to print forms for all the employees, then you need to tap on the checkbox placed against the Employee. Otherwise, you can choose the specific employee names.
- In the next step, you need to click on the Open/Save option.
- Now, select the specific reason for printing the W-2s when the instructions appear on the screen.
- If the employee is receiving the W2 form for the first time, you can click on I’m printing the original employee W-2 option.
- If the W2 form is lost or destructed, then you can select the I’m printing replacement employee W-2 option.
- In case you are printing the W2 form for the company records, you need to select the I’m printing W-2 for my records option.
- Based on your selection a notification related to printing paper will appear on your screen. Thus, you need to ensure that you load the correct paper into your printer.
We hope that you have understood the W2 form in QuickBooks Online Payroll and the basic information related to the basic requirements, and the process of printing. In case you face any technical error while executing the process of printing the W2 form in QuickBooks, you can directly get in touch with the QB enterprise team. We are available 24×7 for taking care of all your needs related to QuickBooks and its operations. The proficient team holds expertise in solving QuickBooks errors in no time. You can call on our toll-free number for assistance or connect through our official website.