Custom email templates are used to personalise and customise the emails before delivering the final mail. Users can customize the mail templates with tailor-made subject lines and body. The feature helps in avoiding the wastage of time that goes into forming the mail wh Despite the top-notch technology, there are certain issues that QuickBooks faces. If you are facing any issue with email templates, then must read till the end and follow the instructions to fix custom email template issue in QuickBooks.
Solutions to Resolve custom email template issue in QuickBooks
Here are the set instructions using which you can resolve the custom email template bug in your Quickbooks desktop.
Solution 1: Copy and paste the correct text in the body section before sending an email.
- Open, QuickBooks and click on the edit option after that tap on Preferences
- Now click on the option Send Forms
- Further, go-to company preferences
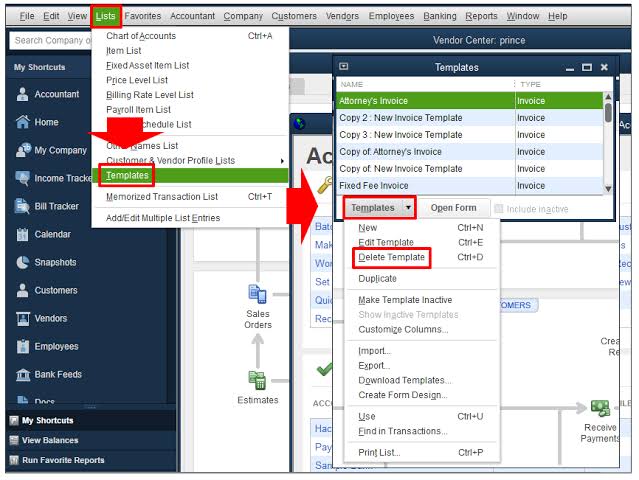
- Choose the template and go to the File menu and then click on send mail.
- In the next step select the mail that you want to send and paste the message in the body section and click on send
Solution 2: Reset Email Later setting
- Locate the transaction that is required to be sent
- In the next step, uncheck the email letter box and hit on save and close.
- Further, reopen the transaction and checkmark the Email Later.
- Next, you need to click on save and close.
- Finally, you need to check if the issue has been resolved or not.
How to create a custom Email Template in QuickBooks
If you are wondering about the Email tempting creation and have not exactly understood the steps then here is the solution. Follow the given steps and execute them carefully.
Step 1: Create and customise the Template
- Open QuickBooks and log in as a QuickBooks administrator.
- After logging in, click on the File tab and press switch to single-user mode
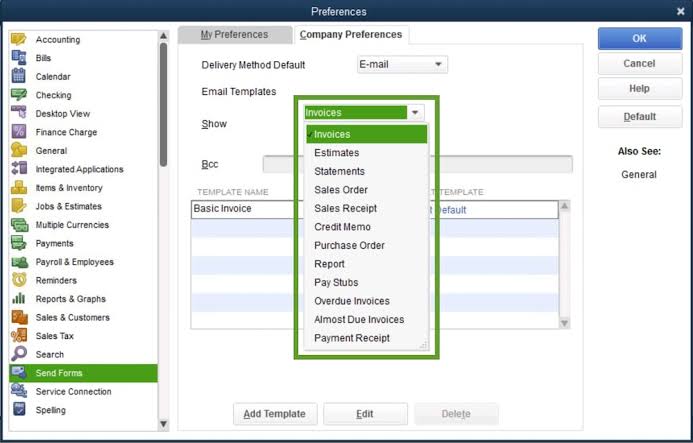
- Now click the edit tab and click on preferences.
- Move to the next screen and click on send forms
- Now go to delivery methods default drop down and click on Email followed by clicking on the transaction type.
- Scroll down to the bottom and click on Add templates, and add a name for the new template.
- In the next step, you need to add the subject line and body
- Now, click on the insert field and add a dynamic data field to the email.
- Put in customer details, such as their name, due date etc and click on save.
- Now go to the company preferences tab and click on OK.
- Now open the send form to set the custom email template as default.
- Go to company preference and select the transaction type that you want to choose.
Step 2: Use the preferred template
- After you have created the custom email template, you can further use it for single other emails like transaction and batch emails etc.
- Whenever you want to use the template, all you need to do is choose the customized email from the menu bar followed by selecting the invoice from the drop-down list. Quickbooks will automatically sync everything.
- In case you click on Email later, you will have to manually select the template by going to File menu>send forms>template
Hopefully, you have understood the process of resolving custom email template issues in QuickBooks efficiently. If you are facing any technical hindrance, you can talk to our experts at QB Enterprise via our toll-free numbers. The team is highly proficient and can effectively solve all the Quickbooks-related errors.