Can we install QuickBooks desktop on two computers? It is a very common question that is asked most frequently. Yes, QuickBooks can be synced with two devices, by using multi-user mode. Well here is the answer to all your queries with further information. Read the entire write-up and follow the steps to install QuickBooks in multi-user mode. If you need any kind of assistance, get in touch with QB Enterprise for expert suggestions on our toll free number.
Easy steps to set up and install QuickBooks in multi-user mode
Users can easily install QuickBooks in multi-user mode using the below-mentioned instructions. For accurate results, it is recommended to go through the steps first, understand them, and then move forward with the steps further.
Step 1: Setting up QuickBooks Desktop
Before beginning the process you have to understand that on a multi-user network, there is one system that hosts all the company files. Whereas, all the other systems that are linked with the network and are known as workstations. Let’s begin with the process.
- Begin with downloading QuickBooks Desktop and installing it in the server system.
- Now, you need to click on Custom and Network Install for choosing the install type.
- In the next step, go to “I’II be using QuickBooks Desktop on this computer option, And I’ll be storing…” if you have access to the full version of QuickBooks on the system.
- Further, follow the popup instructions to finish and conclude the installation process.
- For more security and convenience, it is recommended to keep the QuickBooks Company files on the server system’s hard drive.
Map network Drive-in window
In case you wish to secure the company files on a mapped network drive, then you need to follow the given instructions. The benefits of mapping in network drive include easy access and convenient entrance to the folder and access to the stored files.
For mapping Windows 8/10:
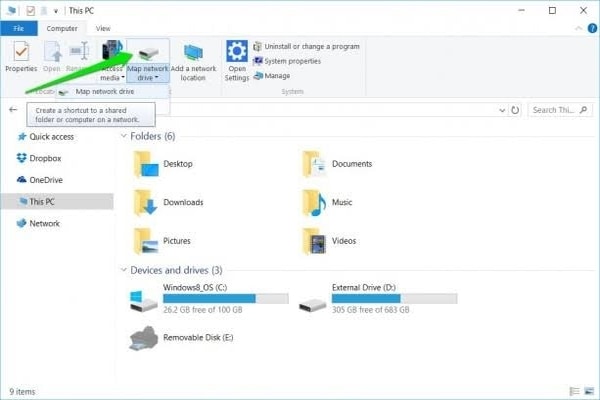
- The first step is to find and click on “My computer” in the search bar.
- Next, click on Map network drive in the Computer tab option
- In the further steps, you need to pick any unused drive and click on Browser.
For Windows 7:
- Go to the Start Menu and begin with selecting Computer.
- Now, go to the Tools menu, further, click on the Map network drive. If you could not locate the Tools menu, then you require to hit the Alt key to show the menu bar.
- In the next step, you need to choose any unused drive letter and then click on Browse.
- Finally, navigate to your network location where the company file is saved.
Step 2: Set up Folder Permission
This section deals with the instructions required for setting up folder permission. You need to ensure that the folder holding company files has access to the network. Make sure that you update every version of install QuickBooks in multi-user mode. Follow the given steps carefully.
Points to remember: :
- Ensure that the right permission is accessible to the installation directory.
- In Microsoft Windows Home Edition, the user needs to restart the system in Safe Mode to complete the process as the security tab is unavailable in normal mode.
To execute the process, follow the steps given below:
- Initially, you need to restart the system followed by pressing F8 to run, Advanced Boot Window.
- In the next step, you need to select Safe Mode on the Advanced Boot window and then hit the Enter tab.
Set up Windows access permission to allow sharing of company files:
- Make sure that authorities & permissions are set appropriately.
- Now, you need to select properties by Right-clicking on the company file folder.
- Further, tap on Advance under the Security tab
- In the next step, you need to select QBDataServiceUserXX and then move to the Edit option
- Check, if given below settings are set to Allowed.
- Traverse Folder/ Execute File
- Read Attributes
- Create files/Write Data
- List Folder/Read Data
- Create Folders/Append Data
- Write Attributes
- Write extended Attributes
- Read Permissions
- Read Extended Attributes
In case there is an error in setting permission, then follow the given steps:
- Begin with right-clicking on the company file folder followed by tapping on Properties.
- In the next step click on Security and select Edit.
- Now, click on QBDataServiceUserXX and then move to Full Control, afterwards click on Allow.
- In the end, Click the Apply option and then press OK.
How to Change Folder Permission
- Press Window+E to open File Explorer
- In the next step navigate to the parent folder, and click on properties.
- Keep a track that the process must be executed for every folder that is included in the list, however, all the folders might not apply to every installation as they apply to specific versions of the software.
- C:\Program Data\Intuit\Entitlement Client\v8
- C:\Program Data\Intuit\Entitlement Client\v6.0
- C:\Program Data\Intuit\Entitlement Client\v5
- C:\Program Data\Intuit\Entitlement Client\v3
- C:\Program Data\Intuit\Entitlement Client
- C:\Program Data\Intuit\QuickBooks Enterprise Solutions X.0 (X = version) or C:\Program Data\Intuit\QuickBooks 20XX (XX = year)
- C:\Program Data\COMMON FILES\INTUIT
- C:\Program Data\COMMON FILES\INTUIT\QUICKBOOKS
- C:\Users\Public\Public Documents\Intuit\QuickBooks\FAMXX (XX = year)
- C:\Users\Public\Public Documents\Intuit\QuickBooks\Company Files
- Now click on the Security tab and press Everyone. Also, note that if the option “Everyone’ is not listed in Group you must select Add and type in Everyone followed by hitting OK.
Set Windows access permissions to share company
Windows 10, 8 and 7
- Pres Windows+E to open File Explorer
- Now right-click that folder containing the Company file.
- In the next step go to Properties, and click on the option,> then Sharing > Share Add.
- Further, select the QBDataServiceUserXX that corresponds to your version.
- Set permission to access full control over the file.
Windows 8.1
- Begin with taking ownership of the file.
- Now you need to select the folder for taking ownership and click on Share.
- Further, go to Advanced Security, then Change followed by Advanced and finally Find Now.
- Finally, you need to select the user and click on OK.
Methods to Grant Full Control
- First, you need to select the folder and then click on the Share option.
- Now, navigate to the Advanced Security option click on Add and then Select a principal.
- Further, hit the Advanced option followed by clicking on Find Now.
- Next, you need to select the user and click OK
- Click on Full Control and then press OK.
Windows Server 2012
Ensure File and Storage Services are installed.
- Press Ctrl+R to open Run Command
- In the next step, you need to type in ServerManager and press enter.
- Further, you need to tap on File and Storage Services followed by clicking on the Share option.
- Move to the Task drop-down, and select New Share. Now a File Share Profile will appear on the screen.
- Now, you need to click on SMB Share – Quick. And keep in that SMB Share – Quick is the default profile.
- Finally, go to In share location selection, choose Type a custom path and then locate the folder that is to be shared and press next.
Step 3: Install Database Server Manager
- In this process, you need to utilise the QuickBooks Desktop Manager to verify an existing setup. To scan the company file in the system where the file is located.
- Make sure the database server manager is present and activated in your system to further help in sharing company files with other systems over the network.
Step 4: Alter admin rights
For setting up Quickbooks on two computers, you need to sign in with the user credentials and ensure that the account and Database server manager has admin rights.
Step 5: Use of DSM
- DSM stands for Database Server Manager, and it must be used for scanning folders that consist of company files.
- As the scan finishes, you will have access to the “QuickBooks company files found”.
- Further, access the company files available in the folders through other systems via a network.
Step 6: Turn on hosting
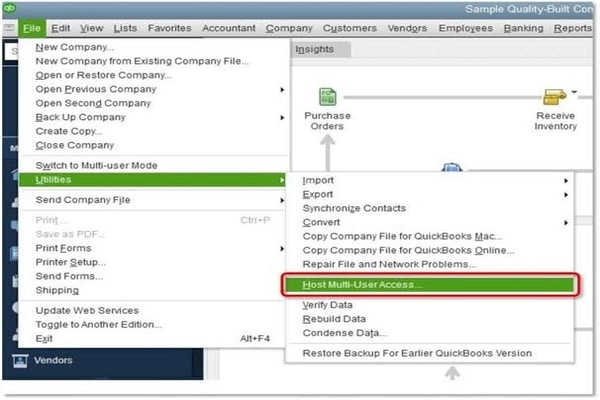
- Ensure that the server system should be in the system that has activated hosting.
- Then go to QuickBooks Desktop, and click the File menu followed by tapping on Utilities.
- In the next step, you need to click on the Host Multi-User Access.
- Now click Yes to confirm the changes and can easily host your company files through the network.
Now that you have understood the steps to set install QuickBooks in multi-user mode, you can get your hands on the efficient process. In case you face any technical glitches or hindrances then you can talk to our proficient team via our toll-free number. You can also connect with us via our official website. QB Enterprise can be reached 24×7 for optimum services.