
QuickBooks is undoubtedly one of the best accounting software that fantastically manages the financial books of business. The software significantly helps in fostering the business by handling. The top notch innovations and technology doesn’t make it error free. There is one very common error that you can encounter: Could not connect the email server in QuickBooks Error.
Here are certain solutions that can help in getting rid of the error.
What is “Could not connect the email server in QuickBooks Error”
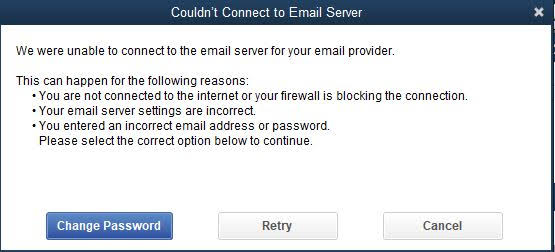
Error: Could not connect the email server in QuickBooks arises when a user tries to send a form and the software doesn’t support and reflects an error message on screen. The message states “QuickBooks could not connect to the remote server, please try again after sometime,”. Although the error can be manually resolved and if you face any technical glitch further then you must get in touch with professionals. But to resolve the error you must understand the causes behind the error.
Causes behind not connecting with the email server in QuickBooks Error
There are many reasons that can trigger the “Could not connect the email server in QuickBooks Error”. Check out the fee most common causes of QuickBooks error stating difficulty in connecting with Email server.
- Poor internet connection and network connection
- If the user enters incorrect I’d and password
- Damaged Email application
- Damaged data record
- If email servers setting is incorrect
- Outdated QuickBooks software
- When the user is not logged in with the Admin account
How to Fix Could not connect the email server in QuickBooks Error
Follow the following solutions to fix the error, and get rid of the error Could not connect the email server in QuickBooks.
Solution 1: Update the QuickBooks to latest version
- Navigate to the update to the Latest page and release it
- Ensure to select your page and now go to the Change link and select your product.
- Click on the Update button to download the update file.
- Select Setup Automatic Updates in order to learn, how to set QuickBooks to automatically download and install
Solution 2: Align settings in the web mail preferences
- Go to QuickBooks Edit menu, and then select Preferences.
- Move to the left pane, click on Send Forms.
- Now you need to take the mouse pointer under My Preferences, select the email account you are using, then select the Edit option given beside.
- Further you must go to the Edit Email Info screen, and then to the SMTP Server Details section.
- In SMTP server detail you need to set the server name and then it is required to be ported to your email provider settings.
- You can refer to Set up your email service in QuickBooks Desktop to check the list of SMTP Server and Ports.
Solution 3: Resetting of Internet Explorer to default
- Open Internet Explorer, and click on the Tools menu (Alt +T)
- Now you need to select Internet Options.
- Further, Navigate to the Advanced tab, then make sure you restore the Advanced Settings.
- Finally select OK, shut the browser.
If the “Could not connect the email server in QuickBooks” Error has yet not subsided, then do not worry. Check if you followed all the methods carefully, and till the end. If you still fail to update and close the accounts then you might need to get in touch with professionals. Get in touch with the expert team of quickbooksenterprisesupport, so they can help you in getting rid of the technical error. You can call on the toll free number or connect through the official mail.